

I still remember the first time I heard about Greek Yogurt Bagels. It was a chaotic Saturday morning, my pantry was sparse, and I was craving something chewy and substantial, but also, you know, easy. My friend Maya, always full of kitchen hacks, casually mentioned, "Oh, just make those two-ingredient bagels." Two ingredients? My skeptical self was ready for a disaster. But honestly, the idea of fresh, warm bagels without yeast, without all that proofing drama, just hooked me. The kitchen was a floury mess by the end, as it always is when I get excited, but the smell of those baking bagels? Pure magic. It quickly became my secret weapon for a satisfying breakfast.
My first attempt at shaping these Greek Yogurt Bagels was... well, let's just say they looked more like lumpy donuts than actual bagels. I tried rolling the dough into ropes and joining the ends, but my ropes were uneven, and the seams kept splitting. My husband walked in, took one look, and asked if I was making avant-garde bread art. We still laugh about it. Now, I’ve got a better system, but it just goes to show, even simple recipes can have their clumsy moments!
Ingredients for Your Greek Yogurt Bagels
- Self-Rising Flour: This is the magic ingredient that makes these Greek Yogurt Bagels possible without yeast. Seriously, it's a game-changer. Don't try to substitute with regular flour unless you want a flat, sad disc I learned that one the hard way, oops!
- Plain Greek Yogurt: The other half of our dynamic duo! Full-fat or 2% works best for a tender crumb. Skip the non-fat if you can, I tried it once, and the dough was a bit too sticky and the bagels lacked that richness. Fage is my go-to, but any thick Greek yogurt will do.
- Salt: A pinch, because even simple dough needs a little seasoning. It really brings out the flavor of the flour and yogurt. I always forget it, then kick myself when they taste a little bland. Don't be like me!
- 1 large Egg: Just one, for an egg wash. It gives your Greek Yogurt Bagels that beautiful golden-brown, shiny crust we all crave. It also helps those toppings stick!
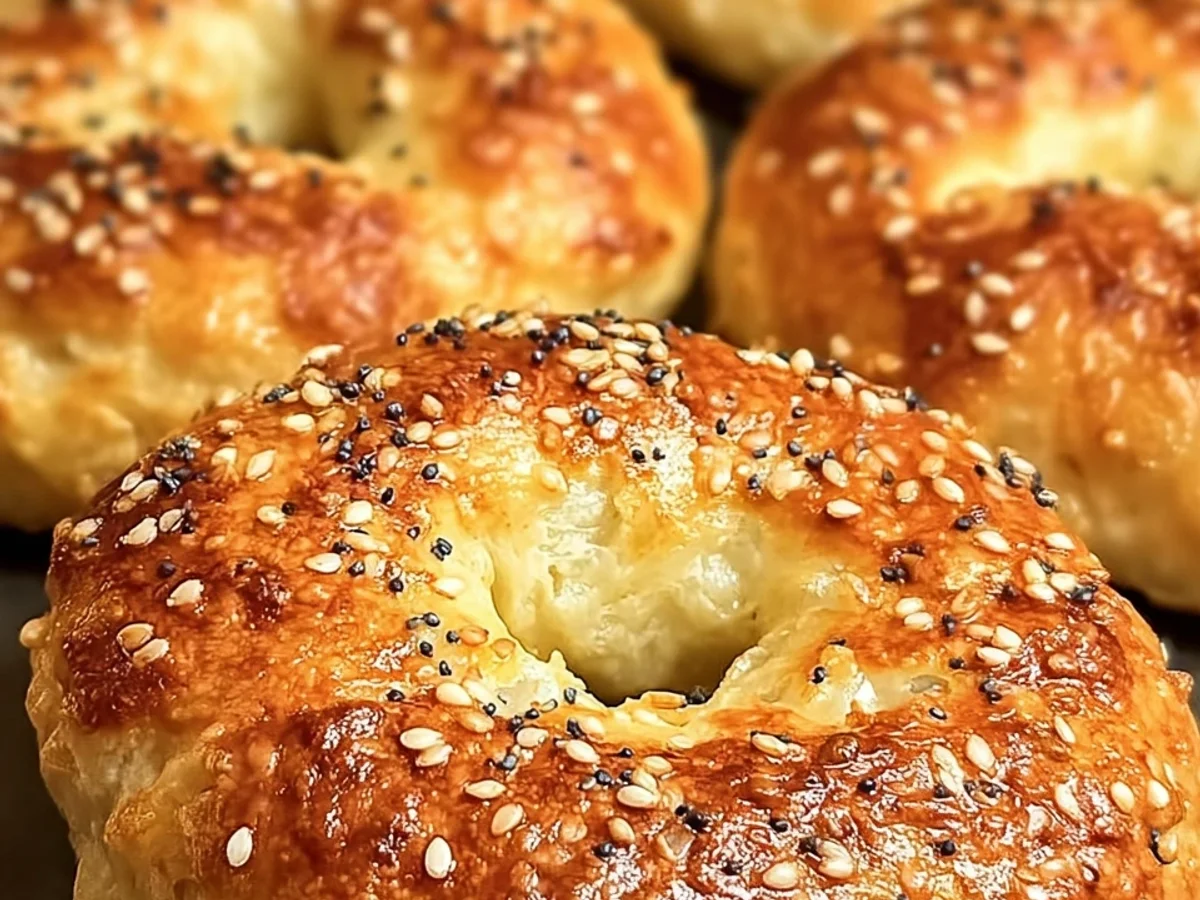
- Everything Bagel Seasoning: My absolute favorite topping! The crunchy, savory mix of sesame seeds, poppy seeds, dried garlic, dried onion, and salt just takes these Greek Yogurt Bagels to another level. You can find it in most spice aisles now, thankfully!
- Sesame Seeds (optional): If you're not an everything bagel fan, or just want something simpler, sesame seeds are classic. They toast up beautifully and add a lovely nutty flavor. My kids prefer these, so I usually do a half-and-half batch.
How to Make These High-Protein Greek Yogurt Bagels
- Mix the Dough:
- Okay, first things first, grab a big bowl. Pour in your self-rising flour and add that plain Greek yogurt. Now, get your hands in there! Seriously, mixing by hand is the best way to feel the dough. You’re looking for a shaggy mess that eventually comes together into a ball. It might seem a little sticky at first, but resist the urge to add too much extra flour. Just keep kneading gently on a lightly floured surface until it’s smooth and not too tacky, maybe 5-7 minutes. I always end up with flour up to my elbows, but it’s part of the fun!
- Divide and Shape Your Greek Yogurt Bagels:
- Once your dough is ready, divide it into six equal portions. I usually just eyeball it, but if you want perfectly uniform Greek Yogurt Bagels, a kitchen scale is your friend here. Roll each portion into a smooth ball. Now for the shaping! You can either poke a hole in the center of each ball with your thumb and gently stretch it out, or roll the dough into a 6-inch rope and pinch the ends together to form a circle. I find the poke-and-stretch method less prone to splitting, honestly. Make sure the hole is big enough because it will shrink during baking!
- Prep for Baking:
- Line a baking sheet with parchment paper a non-negotiable step, trust me, I've had bagels stick before, and it's a tragedy. Carefully place your shaped Greek Yogurt Bagels onto the prepared sheet, making sure they have a little breathing room. Preheat your oven to a good, hot 375°F (190°C). This high heat helps them get that lovely golden crust and rise beautifully. While the oven heats, crack that egg into a small bowl and whisk it up for your egg wash. This is where the magic really starts to happen!
- Egg Wash and Top the Bagels:
- Now, grab that whisked egg and a pastry brush. Gently brush the tops and sides of each bagel with the egg wash. Don't be shy, but don't drown them either. This wash is what gives them that classic shiny, golden finish. This is also the moment to sprinkle on your favorite toppings! My kitchen always smells amazing when the everything bagel seasoning hits the raw dough that garlic and onion aroma is just divine. Press the toppings gently so they adhere well. You can even do a mix, like half with sesame seeds and half with everything seasoning, if you're feeling indecisive.
- Bake to Golden Perfection:
- Carefully transfer your baking sheet with the topped Greek Yogurt Bagels into the preheated oven. Let them bake for about 20-25 minutes. Keep an eye on them, because every oven is a little different! You’re looking for a beautiful golden-brown color and a firm, slightly crisp exterior. They'll puff up nicely, and your kitchen will start smelling absolutely incredible, like a real bakery. Honestly, I sometimes just stand by the oven, watching them transform. It's so satisfying!
- Cool and Enjoy Your Greek Yogurt Bagels:
- Once they’re perfectly golden and baked through, carefully remove the baking sheet from the oven. Resist the urge to dive in immediately I know, it’s hard! Let the Greek Yogurt Bagels cool on a wire rack for at least 10-15 minutes. This cooling time is crucial, it allows the inside to set properly and gives you that perfect chewy texture. If you cut into them too soon, they can be a bit gummy. But once they've cooled a bit, slice them open, toast them if you like, and slather with whatever your heart desires. Pure homemade happiness!
There was one time I was so excited to make these Greek Yogurt Bagels for brunch, I totally forgot to preheat the oven. I shaped them, topped them, popped them in, and then realized the oven was cold! They sat there for a good 15 minutes before I caught my mistake. They still turned out okay, a little less puffy than usual, but my family just laughed it off. It's a good reminder that even when things go a little sideways, homemade is always special.
Storage Tips for Your Homemade Greek Yogurt Bagels
Okay, so you've made these delicious Greek Yogurt Bagels, and now you have leftovers (if you're lucky!). My advice? Let them cool completely first. Seriously, trying to store warm bagels just creates condensation and makes them soggy, which nobody wants. Once cool, pop them into an airtight container or a large Ziploc bag. They’ll stay fresh and chewy at room temperature for about 2-3 days. I’ve tried keeping them longer on the counter, and by day 4, they're definitely past their prime for enjoyable chewing. For longer storage, slice them, then freeze them in a freezer-safe bag. When you want one, just grab a slice and pop it straight into the toaster. They toast up beautifully from frozen, almost like fresh! I microwaved one once to "defrost" it, and it turned into a rubbery, sad thing. Learn from my mistakes, stick to the toaster!

Ingredient Substitutions for Greek Yogurt Bagels
Life happens, and sometimes you don't have exactly what the recipe calls for. I get it! For the self-rising flour, you can make your own by combining 1 cup all-purpose flour with 1.5 teaspoons baking powder and 1/4 teaspoon salt. I've done it in a pinch, and it works, kinda the texture is a smidge denser, but still good! If you don't have Greek yogurt, any thick plain yogurt will work, but make sure it's thick or your dough will be too wet. I once tried a thinner "natural" yogurt, and the dough was a sticky, unmanageable mess. For toppings, get creative! Poppy seeds, coarse salt, dried onion flakes, or even cinnamon sugar for a sweet twist (though I prefer savory with these Greek Yogurt Bagels). I've even sprinkled grated cheese on them before baking, it was a gooey, savory dream. Don't be afraid to experiment!
Serving Your Greek Yogurt Bagels with Flair
These Greek Yogurt Bagels are so versatile, they're like a blank canvas for your breakfast dreams! My absolute favorite way to eat them is toasted, still warm, with a generous schmear of plain cream cheese and a sprinkle of fresh dill. The dill just elevates everything, honestly. For a heartier meal, pile on some smoked salmon, capers, and red onion total brunch vibes! If I'm feeling a bit fancy, sometimes I'll whip up some avocado toast on one, maybe with a fried egg on top. And for a truly comforting experience, pair a warm bagel with a big mug of coffee and a good book on a rainy morning. It’s my little slice of heaven. They also make fantastic mini sandwiches for lunchboxes!
The Simple Origins of Greek Yogurt Bagels
While traditional bagels have a rich, centuries-old history rooted deeply in Jewish communities in Poland, these Greek Yogurt Bagels are a much more modern, internet-era invention! They really took off as a viral sensation, especially with the rise of healthier eating trends and the popularity of high-protein Greek yogurt. I first stumbled upon the concept on a health blog, and it felt like such a clever kitchen hack. It's not about replicating a traditional New York bagel exactly, but about creating a quick, satisfying, and healthier alternative using accessible ingredients. It’s a testament to how creative home cooks can be, taking simple pantry staples and transforming them into something genuinely delicious. It's a modern classic in my kitchen, a fusion of convenience and wholesome goodness.
Making these Greek Yogurt Bagels has honestly brought so much simple joy to my kitchen. From those first lumpy attempts to the perfectly golden ones I bake now, each batch feels like a little win. There's just something incredibly satisfying about pulling fresh, warm bagels out of your own oven. They’re a reminder that sometimes the simplest ingredients can create the most comforting and delicious meals. I hope you give them a try and find as much happiness in them as I do. Don't forget to share your own kitchen adventures and topping ideas!

Frequently Asked Questions About Greek Yogurt Bagels
- → Why do my Greek Yogurt Bagels sometimes turn out dense?
Oh, I’ve been there! Usually, it’s because the dough was either overworked or you added too much flour. A light hand when kneading and resisting the urge to add extra flour if it's a bit sticky helps keep them nice and fluffy. Less is more, honestly!
- → Can I use non-fat Greek yogurt for these bagels?
You can, but I wouldn't recommend it for the best texture. I tried it once, and the dough was a bit too wet and the resulting bagels were drier. Full-fat or 2% Greek yogurt gives you a richer, more tender bagel. Trust your blogger friend on this one!
- → What's the trick to getting the hole to stay open?
Ah, the shrinking hole dilemma! When you shape your Greek Yogurt Bagels, make the hole larger than you think you need. It will definitely shrink during baking. Stretching it a bit more before baking helps a lot. Sometimes I even reshape it slightly halfway through baking, oops!
- → How long do homemade Greek Yogurt Bagels last?
In my experience, they're best within 2-3 days at room temperature in an airtight container. After that, they start to lose their charm. Freezing them sliced is my go-to for longer storage just pop a slice in the toaster whenever a craving hits!
- → Can I make these bagels sweet instead of savory?
Absolutely! I’ve tried it. Skip the savory toppings and brush with egg wash, then sprinkle with cinnamon sugar before baking. You could even knead a little bit of sugar or some dried cranberries into the dough. Get creative, it's your kitchen!