

Honestly, some of my fondest childhood memories involve the smell of cinnamon and vanilla wafting from the kitchen on a Saturday morning. My grandma, bless her heart, wasn't one for fancy breakfasts, but her Classic French Toast? That was pure magic. I remember once, I tried to “help” by cracking eggs, and let's just say a few shells ended up in the batter. She just laughed, picked them out, and told me that's how we learn. This dish isn't just food, it’s a hug on a plate, a moment of calm before the day gets going. It's special because it's simple, comforting, and always reminds me of home.
I once tried to get all fancy with this Classic French Toast, using some sourdough bread I had lying around. Oops! It was... interesting. The texture was all wrong, a bit too chewy and not nearly custardy enough. My kids gave me the side-eye, and honestly, I don't blame them. Sometimes you just gotta stick to what works, right? That morning taught me that while experimentation is fun, some classics are classics for a reason.
Ingredients for Classic French Toast
Custard Base
- Eggs: You need good, fresh eggs for that rich, custardy center. Don't skimp here, I usually go for large ones.
- Whole Milk: Please, for the love of all that is delicious, don't use skim milk! Whole milk gives you that creamy, dreamy texture. I tried almond milk once, and it worked... kinda, but it wasn't the same lusciousness.
- Granulated Sugar: Just a touch to sweeten the batter. It helps with browning too!
- Vanilla Extract: I swear by pure vanilla extract. It makes a huge difference in the aroma and flavor. Avoid the imitation stuff if you can, it just doesn't hit right.
- Ground Cinnamon: This spice is non-negotiable for me. It adds that warm, familiar scent and taste that screams French Toast. Sometimes I add a pinch more because I love that cozy spice.
The Bread
- Thick-Cut Brioche or Challah: This is the secret weapon for truly fluffy Classic French Toast. The richness and slight sweetness of brioche or challah soak up the custard beautifully without falling apart. I once used thin sandwich bread, and it just got soggy a total disaster!
Finishing Touches
- Unsalted butter: For cooking! It gives the French Toast those lovely golden edges and a hint of buttery flavor.
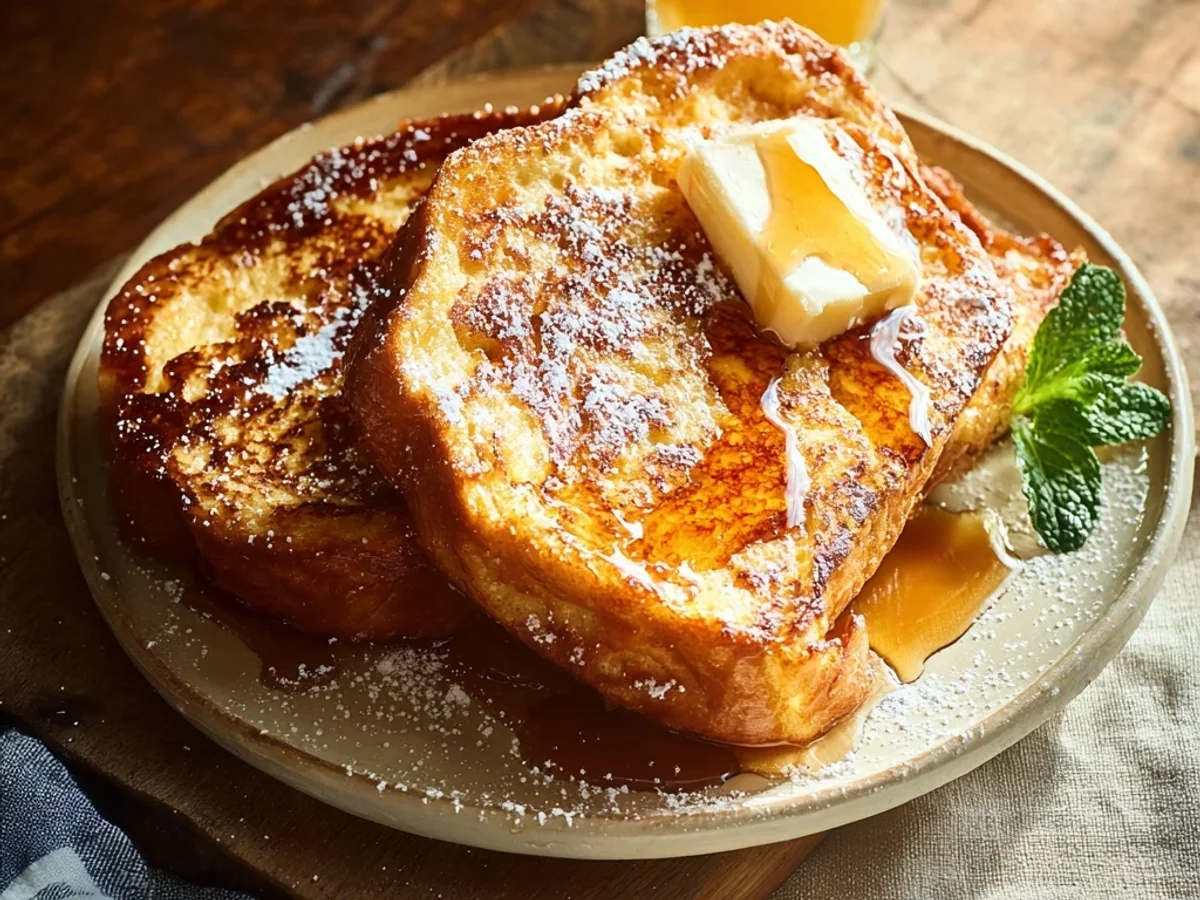
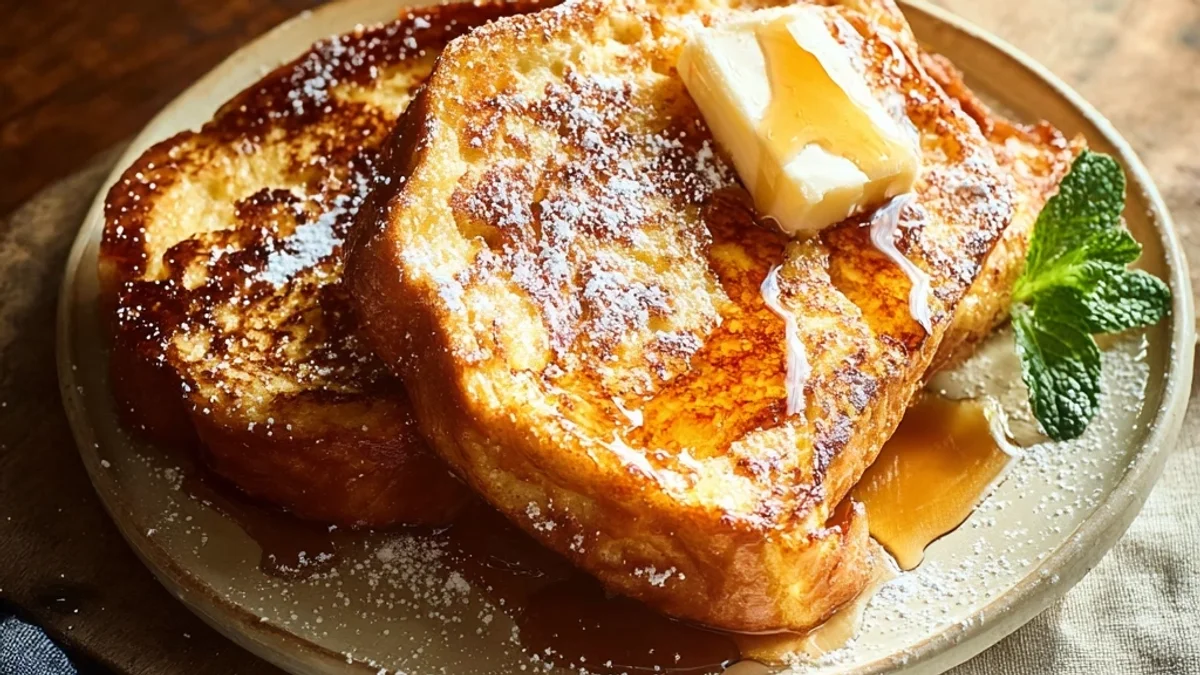
- Maple Syrup: Real maple syrup, please. The fake stuff just doesn't compare to that rich, earthy sweetness.
- Fresh Berries: A mix of strawberries, blueberries, and raspberries adds a fresh, tangy contrast to the sweet Classic French Toast.
- Powdered Sugar: A dusting over the top just makes it look so pretty and adds another layer of subtle sweetness.
Instructions for Making Classic French Toast
- Whisk the Custard:
- First things first, grab a wide, shallow dish like a pie plate or a casserole dish. This is where the magic starts! Crack your eggs into it, then pour in the whole milk, sugar, vanilla extract, and ground cinnamon. Give it a really good whisk until everything is fully combined and the mixture looks smooth and slightly frothy. You want to make sure there are no streaks of egg white left. Honestly, this is where I sometimes get impatient and don't whisk enough, which means unevenly flavored Classic French Toast later. Don't be like me, take your time!
- Soak the Bread:
- Now for the bread! Take those beautiful thick slices of brioche or challah and gently place them into the custard mixture, one or two at a time, depending on the size of your dish. Let each side soak for about 20-30 seconds. You want the bread to absorb the custard, but not become completely saturated and fall apart. It's a delicate balance! My first few times, I'd leave them in too long and end up with soggy, broken pieces when I tried to flip them. Oops! You're looking for a soft, slightly heavier feel, but still intact.
- Heat the Pan:
- While your bread is soaking, get your skillet or griddle nice and hot over medium heat. Drop in about a tablespoon of unsalted butter and let it melt and coat the pan. You'll see it shimmer and maybe even hear a gentle sizzle. This is crucial for getting that gorgeous golden-brown crust on your Classic French Toast. If the pan isn't hot enough, the bread will just sit there and get greasy, and if it's too hot, it'll burn before the inside cooks through. Trust your instincts here!
- Cook the French Toast:
- Carefully transfer the soaked bread slices to the hot, buttered pan. Don't overcrowd the pan, give them some space to breathe and cook evenly. Cook for about 3-4 minutes per side, or until they're beautifully golden brown and the center feels cooked through. You'll see the edges crisping up and smell that incredible buttery, cinnamony aroma filling your kitchen. Sometimes I peek a little too early, but patience pays off for truly golden Classic French Toast!
- Keep Warm (Optional):
- As each batch of Classic French Toast finishes cooking, you can transfer them to a baking sheet and keep them warm in a preheated oven at a low temperature (around 200°F / 95°C) while you finish cooking the rest. This ensures everyone gets a warm, fresh piece at the same time. I usually skip this step when it's just me, but for a crowd, it's a game-changer! It keeps the texture just right too.
- Serve and Garnish:
- Once all your Classic French Toast is cooked, stack it up high on plates! Now for the fun part: garnish generously with a dusting of powdered sugar, a drizzle of real maple syrup, and a handful of fresh berries. The vibrant colors of the berries against the golden-brown French Toast are just so inviting. You'll feel and smell the warmth, and that first bite is pure bliss crispy edges, custardy center, and bursts of fresh fruit. So good!
There was this one Sunday morning, total chaos in the kitchen. Kids were asking for a million things, coffee was brewing, and I accidentally grabbed the wrong sugar for the Classic French Toast batter brown sugar instead of white. I didn't realize until the bread was already soaking! I just went with it, and honestly, it gave the French Toast this deeper, almost caramel-y note. It was a happy accident, one of those moments where kitchen mishaps turn into delicious discoveries.
Storing Classic French Toast
Okay, so storing Classic French Toast is totally doable, but you gotta be smart about it. I usually let any leftovers cool completely on a wire rack first. If you stack them warm, they get soggy, and nobody wants that! Once they're cool, I layer them in an airtight container with parchment paper between each slice to prevent sticking. They'll keep in the fridge for about 2-3 days. Reheating is best in a toaster oven or even a regular oven at 350°F (175°C) for about 5-7 minutes until warmed through and a little crispy. I microwaved it once, and the texture was just... off, a bit rubbery. So, don't do that lol. You can also freeze individual slices for up to a month, just pop them in a freezer bag, again with parchment paper. Reheat from frozen in the toaster oven for a quick breakfast!

Classic French Toast Substitutions
I've played around with Classic French Toast quite a bit, so I have some honest thoughts on substitutions. For the milk, if whole milk isn't an option, a good full-fat oat milk or even half-and-half can work. I tried coconut milk once, and while it was creamy, it gave a slight coconut flavor that wasn't quite right for a traditional French Toast. As for the bread, if you can't find brioche or challah, Texas toast or even day-old white sandwich bread (the thicker slices!) will do in a pinch. Just be careful not to over-soak thinner breads. For the sugar, maple syrup or honey can be whisked into the custard instead of granulated sugar, which adds a lovely depth of flavor. And if you're out of vanilla, a tiny bit of almond extract can give a similar aromatic boost, but use it sparingly it's strong!
Serving Suggestions
Oh, the possibilities for serving Classic French Toast! Beyond the classic maple syrup and berries, I love to get creative. For a fancy brunch, I'll pair it with a side of crispy bacon or savory breakfast sausage to balance the sweetness. A dollop of whipped cream or a scoop of vanilla ice cream on warm French Toast is an absolute dream for dessert. For drinks, a hot cup of coffee, a mimosa, or even a glass of freshly squeezed orange juice complements it perfectly. This dish and a lazy Sunday morning, maybe with a good book or a rom-com? Yes please. Sometimes I'll even add a sprinkle of toasted pecans or a drizzle of chocolate sauce if I'm feeling extra decadent. It's truly versatile!
Cultural Backstory
You know, Classic French Toast, despite its name, has roots that are way older than France itself! There are recipes for bread soaked in milk and eggs dating back to the Roman Empire. They called it 'Pan Dulcis' sweet bread. It was a clever way to use up stale bread, making it delicious again. The French version, 'Pain Perdu' (lost bread), also speaks to this idea of reviving bread that would otherwise be tossed out. For me, discovering this made me feel a deeper connection to the dish. It's not just a recipe, it's a testament to resourcefulness and making something wonderful out of humble ingredients. It became even more special knowing it’s a tradition that's been passed down through centuries, and now, it's a part of my family's breakfast rituals too.
Making Classic French Toast still brings a smile to my face, every single time. It's messy, sometimes a little chaotic with butter splattering, but the end result is always worth it. That golden-brown crust, the soft, custardy center, the smell that fills the house it just feels right. It's a simple pleasure, a reminder that the best things often are. I hope you give this a try and maybe even make some of your own delightful kitchen memories with it!

Frequently Asked Questions About Classic French Toast
- → Can I make the Classic French Toast batter ahead of time?
Yes, absolutely! I often whisk up the custard the night before and store it in an airtight container in the fridge. It saves so much time in the morning, and the flavors really get a chance to meld. Just give it a quick whisk before soaking the bread.
- → What's the best bread for Classic French Toast?
For me, it’s hands down brioche or challah. Their rich, slightly sweet nature and sturdy texture soak up the custard without falling apart. I once tried a plain baguette, and it was just too dense, it didn’t get that fluffy interior I love.
- → Why does my French Toast get soggy?
Usually, it's either because you're soaking the bread for too long, or your pan isn't hot enough. I've definitely made this mistake! Aim for about 20-30 seconds per side, and make sure your pan is shimmering with butter before adding the bread.
- → How do I store leftover Classic French Toast?
Let it cool completely, then store in an airtight container in the fridge for 2-3 days, with parchment paper between slices. Reheat in a toaster oven for best results. Microwaving makes it a bit rubbery, which is a no-go for me.
- → Can I make this Classic French Toast dairy-free?
You can! I've had decent luck using full-fat oat milk or almond milk in the custard. The texture won't be quite as rich as with whole milk, but it's a good alternative. Just be sure to use a dairy-free butter substitute for cooking.