

Remember those dazzling hibachi chefs, the clanging spatulas, the onion volcano? Oh, to be back at a teppanyaki grill, soaking in the smells and sounds! For years, I chased that restaurant magic at home, usually ending up with a sad, soggy rice situation. Honestly, my first few attempts at making fried rice were… well, let's just say they were more 'steamed rice with things' than actual fried rice. But persistence (and a serious craving) paid off! This easy hibachi fried rice recipe finally cracked the code, bringing that savory, smoky goodness right into my kitchen. It's become a comforting staple, a little piece of that lively restaurant experience I can whip up whenever the mood strikes.
I remember one chaotic Tuesday evening, trying to get dinner on the table. My little one decided to 'help' by adding an extra splash (or three) of soy sauce. I didn't expect that much! The result? A surprisingly dark, but still incredibly tasty, batch of hibachi fried rice. We just rolled with it, added a bit more butter to balance it out, and honestly, it was one of the most memorable meals. Sometimes, those little kitchen 'oops' moments turn into the best discoveries, don't they?
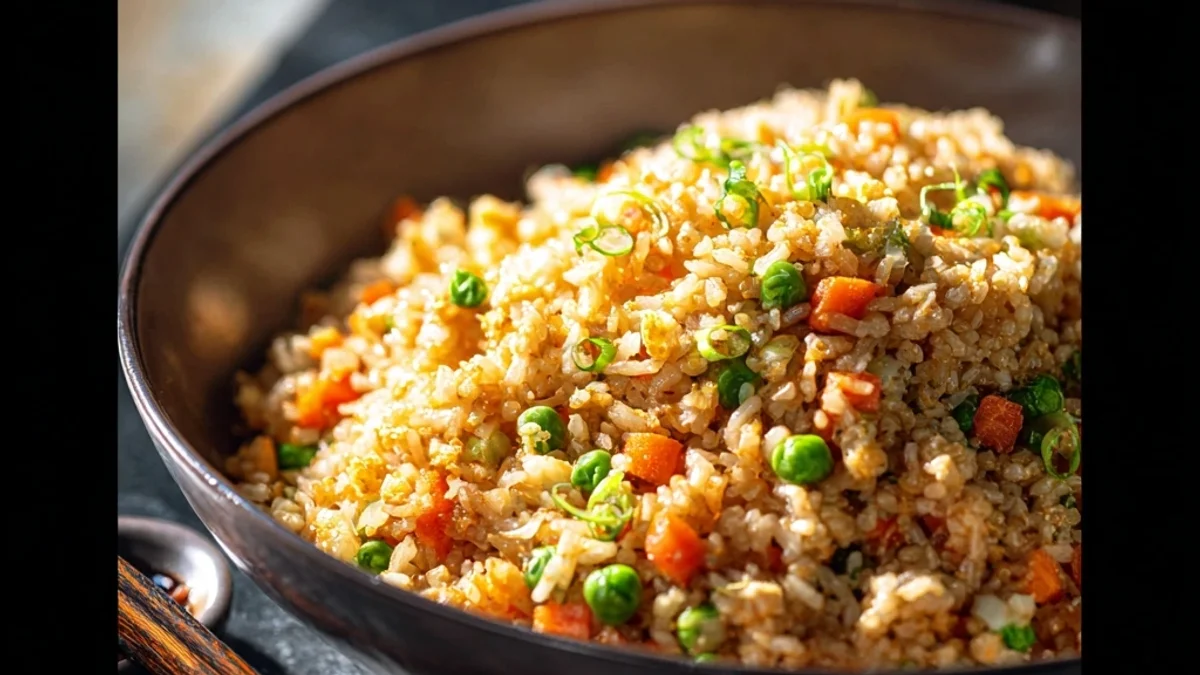
Ingredients
- Cold Day-Old Rice: This is non-negotiable, folks! Freshly cooked rice is too moist and will give you a gummy, sad fried rice. We want fluffy, separate grains for our hibachi fried rice, so plan ahead and chill your rice.
- Eggs: I love the little bits of scrambled egg throughout. It adds a lovely texture and a touch of richness. No need for anything fancy here, just whisk and scramble!
- Unsalted Butter: For that authentic, rich hibachi flavor. Honestly, don't skimp. A generous pat makes all the difference, giving the rice a beautiful sheen and taste.
- Soy Sauce: My go-to for umami depth. I usually opt for a good quality, low-sodium version so I can control the saltiness. I once tried a weird 'coconut aminos' substitute and it worked... kinda, but traditional soy sauce is where it's at for this hibachi fried rice.
- Garlic &, Ginger: Freshly minced, always! The aroma when these hit the hot pan is just heavenly. I tend to add a little more garlic than a recipe calls for, because, well, it's garlic!
- Yellow Onion &, Carrots: Finely diced so they cook quickly and blend into the hibachi fried rice. I've had kitchen disasters trying to use big chunks, they just don't soften properly.
- Frozen Peas: A pop of color and sweetness! Frozen is perfectly fine here, no need to fuss with fresh. Just toss them in straight from the freezer.
- Green Onions: For a fresh, mild oniony bite and a pretty garnish. They add a nice contrast to the richness of the hibachi fried rice.
- Sesame Oil: A drizzle at the end for that signature nutty aroma. It really elevates the flavor profile, giving it that restaurant finish.
Instructions
- Prep Your Hibachi Fried Rice Ingredients:
- Before you even think about turning on the stove, get everything chopped and ready. This is where I always forget to mince the ginger until the pan is hot, sigh. Dice your onion and carrots super fine, mince the garlic and ginger, and slice those green onions. Whisk your eggs in a small bowl. Having everything prepped makes the cooking process so much smoother and faster for our hibachi fried rice.
- Scramble the Eggs:
- Heat a little bit of butter in a large skillet or wok over medium-high heat. Once melted, pour in your whisked eggs. Let them cook for about 30 seconds without stirring, then scramble them gently until they're just set but still soft. Don't overcook them! We want fluffy bits, not rubbery ones a mistake I made early on. Remove the eggs from the pan and set them aside for a moment.
- Sauté the Aromatics:
- Add another tablespoon of butter to the hot pan. Once it's shimmering, toss in your finely diced onion and carrots. Sauté them for 2-3 minutes until they start to soften, then add the minced garlic and ginger. That smell! It's the true start of something wonderful. Cook for another minute until fragrant, being careful not to burn the garlic I've done it, and it's not fun.
- Add the Hibachi Fried Rice Veggies:
- Push the sautéed aromatics to one side of the pan. Add the frozen peas directly to the pan, letting them cook for a minute or two until thawed and slightly tender. Give everything a good stir to combine. Don't crowd the pan, trust me on this, it helps everything cook evenly and get that nice char.
- Bring in the Rice:
- Now for the star of our hibachi fried rice show! Add the cold, day-old rice to the pan. Break up any clumps with your spatula. Increase the heat to high and let the rice sit undisturbed for a minute or two to get a little crispy on the bottom. Then, stir and repeat. This is where the magic happens, giving it that lovely fried texture.
- Season and Finish Your Hibachi Fried Rice:
- Once the rice is heated through and slightly crispy, push it to one side. Add the scrambled eggs back into the pan. Drizzle the soy sauce directly onto the hot pan, letting it sizzle for a moment before tossing everything together. Stir in the sliced green onions and a final drizzle of sesame oil. Give it one last good stir, taste, and adjust seasonings if needed. Boom! Delicious hibachi fried rice, ready to devour.
Just last week, after a whirlwind day, I found myself staring at a fridge with nothing but leftover rice and some random veggies. This hibachi fried rice saved the day, honestly. It was a messy, glorious triumph rice grains flying, butter sizzling, the whole nine yards. But when I sat down, fork in hand, it felt like a little slice of culinary peace amidst the chaos. That's the beauty of this dish, it just makes everything feel a little bit better.

Storage Tips
Okay, so you've got leftover hibachi fried rice lucky you! This dish actually holds up pretty well. I usually scoop it into an airtight container and pop it in the fridge. It's usually good for about 3-4 days. Now, here's my personal advice: when reheating, I usually opt for the stovetop. A little splash of water or a tiny pat of butter in a skillet over medium heat, stirring occasionally, works wonders. I microwaved it once without adding any moisture, and the rice got a bit dry and clumpy so don't do that lol. It loses a little of its initial crispiness, but the flavor remains fantastic for a quick lunch.
Hibachi Fried Rice Ingredient Substitutions
Life happens, and sometimes you don't have every single ingredient. I get it! For the veggies, if you don't have peas and carrots, corn works, or even finely diced bell peppers for a pop of color. I tried adding some chopped broccoli once, and it worked... kinda, but it needed to be cooked longer. If you're out of soy sauce, tamari or coconut aminos can work in a pinch, though the flavor profile will shift slightly. Want to add protein to your hibachi fried rice? Cooked shrimp, chicken, or even tofu cubes are fantastic additions. Just cook them separately first, then toss them in at the end with the eggs. Experiment! That's what home cooking is all about.
Serving Your Hibachi Fried Rice
This hibachi fried rice is a star all on its own, honestly. But sometimes, you want to make it a whole experience! For a complete meal, I often serve it alongside some simple grilled chicken or shrimp, maybe a quick cucumber salad for a bit of freshness. It also pairs beautifully with a bowl of miso soup. As for drinks, a crisp iced green tea or even a light lager complements the savory flavors really well. And for a truly cozy night in? This dish and a good rom-com? Yes please. It’s comforting, satisfying, and just feels right, no matter the mood.
The Story Behind Hibachi Fried Rice
While often associated with Japanese cuisine, the "hibachi" style of cooking, particularly with fried rice, has a fascinating history rooted in Japanese-American culinary adaptations. It's less about traditional Japanese home cooking and more about the theatrical teppanyaki grills that became popular in the US, turning a meal into a performance. For me, it evokes memories of childhood celebrations and special occasions. Recreating that familiar, comforting hibachi fried rice flavor at home isn't just about the taste, it’s about bringing a piece of those happy memories into my everyday kitchen. It's a testament to how food can connect us to experiences and cultures, even when we're just whipping it up on a Tuesday night.
So there you have it, my take on easy hibachi fried rice. It’s got a little bit of everything: savory flavors, satisfying textures, and a whole lot of heart. Honestly, it might not be a flaming onion volcano, but it’s real, it’s delicious, and it consistently brings smiles to our dinner table. I hope it does the same for you! Do give it a try, and if you make any fun swaps or have your own kitchen 'oops' moments, I'd love to hear about them in the comments!

Frequently Asked Questions
- → How do I get my Hibachi Fried Rice crispy?
The trick is high heat and not overcrowding the pan! Let the rice sit undisturbed for a minute or two between stirs. This gives it a chance to develop that lovely crispy crust. Trust me, it makes all the difference for a good hibachi fried rice.
- → Can I add different proteins to this Hibachi Fried Rice?
Absolutely! I often add cooked chicken, shrimp, or even thinly sliced beef. Just make sure to cook your protein separately before adding it back in with the rice and veggies. It keeps everything from getting soggy and ensures even cooking.
- → What's the secret to flavorful Hibachi Fried Rice?
Fresh aromatics like garlic and ginger are key! Also, a good quality soy sauce and a touch of butter really build that rich, savory base. Don't be shy with the butter, it gives it that restaurant-style richness, honestly!
- → How long does Hibachi Fried Rice last in the fridge?
Properly stored in an airtight container, your hibachi fried rice will last about 3-4 days in the refrigerator. Just remember my tip about reheating gently on the stovetop to keep it from drying out. Leftovers are great, truly.
- → Can I use fresh rice for this Hibachi Fried Rice recipe?
I wouldn't recommend it, honestly! Freshly cooked rice has too much moisture, which will make your hibachi fried rice gummy and clumpy. Cold, day-old rice is drier and separates beautifully, giving you that perfect texture. Plan ahead!