

I swear, the smell of frying tortillas takes me right back to my abuela's kitchen, even though her version was more like a flauta, honestly. My journey to these crispy Chicken Chimichangas really started after a trip to Arizona years ago. I tasted my first proper chimichanga there, and wow, it was a revelation! I came home determined to recreate that magic. My first few attempts? Total soggy messes, you guys. I didn't expect it to be so tricky to get that perfect crunch, but the quest became a personal mission. These aren't just fried burritos to me, they're comfort food, a little bit of sunshine on a plate, and a nod to those wonderful culinary adventures.
Oh, I still remember the time I tried to fold one of these little beauties, and I must have overstuffed it, or maybe I was just too aggressive with the rolling. It absolutely burst open in the hot oil, showering my stove and my cat, who was suspiciously close by with cheesy chicken filling. My cat was not amused, but I learned a valuable lesson about not being too greedy with the filling! It was a chaotic moment, for sure, but we still laugh about it. That's real kitchen life, isn't it?
Crispy Chicken Chimichangas Ingredients
- Cooked Chicken: I usually grab a rotisserie chicken from the store, it's a huge time-saver and the flavor is already there. Shred it up!
- Monterey Jack Cheese: This melts beautifully and gives that lovely gooey texture. Honestly, don't use pre-shredded if you can help it, fresh block cheese melts so much better.
- Canned Green Chiles: Just a small can, mild usually, for that subtle earthy kick without being too spicy. It really brightens the filling.
- Small Onion: Finely diced, it adds a lovely aromatic base. I sometimes cry a little when chopping, but it's worth it for the flavor.
- Spices (Cumin, Chili Powder, Garlic Powder): These are my go-to flavor boosters. I often add a little more garlic powder than the recipe calls for, because, well, garlic!
- Large Flour Tortillas: Get the burrito-sized ones, about 10-inch. Smaller ones are a nightmare to fold for chimichangas, trust me on that one.
- Vegetable or Canola Oil: For frying! You need enough to submerge the chimichangas halfway. Don't cheap out on the oil, it's crucial for crispiness.
- Red Enchilada Sauce: Store-bought is totally fine here. I've tried making my own, and sometimes it's just not worth the extra effort for a weeknight.
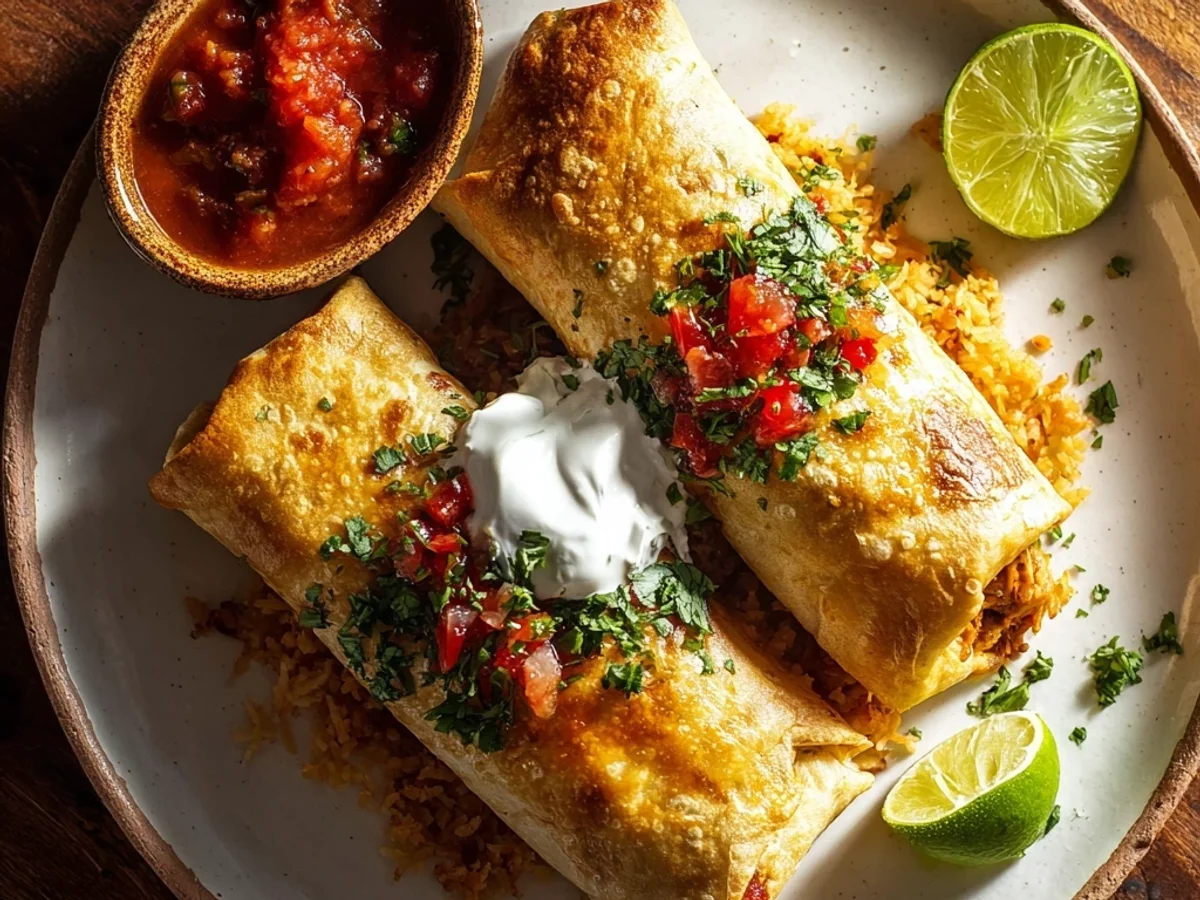
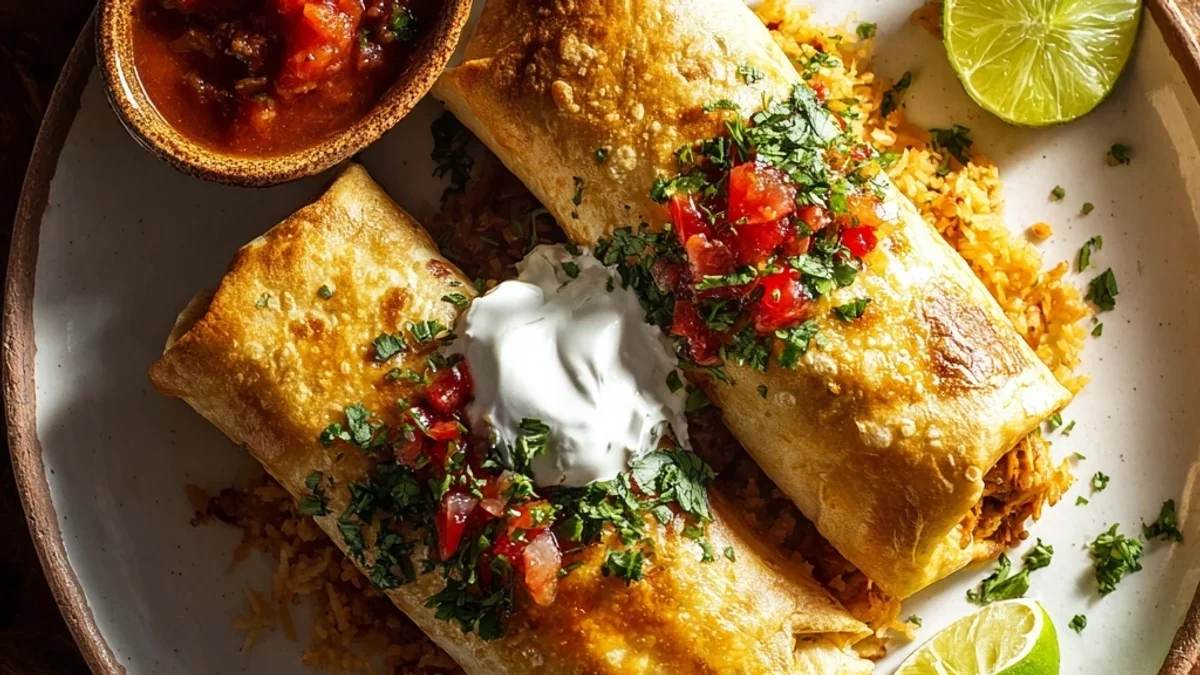
- Sour Cream & Fresh Cilantro: Essential for topping. The cool sour cream balances the fried crispiness, and fresh cilantro just makes everything look and taste vibrant.
How to Make Crispy Chicken Chimichangas
- Prepare Your Chicken Chimichangas Filling:
- First things first, get that chicken ready. If you're using a rotisserie chicken like me, shred it up nice and fine. In a big bowl, mix that shredded chicken with the shredded Monterey Jack cheese, the diced onion, and those lovely green chiles. Stir in your cumin, chili powder, and garlic powder. Give it a good mix until everything is combined. This is where the magic starts to happen, and you can already smell those flavors coming together!
- Warm Your Tortillas & Get Ready to Roll:
- Next, you'll want to warm your tortillas. This is a crucial step I learned the hard way cold tortillas tear! Briefly microwave them for about 15-20 seconds, or warm them in a dry skillet for a few seconds per side until they're pliable. Lay a warmed tortilla flat. Spoon about 1/2 to 3/4 cup of the chicken mixture onto the center. Don't overfill it like I did that one time, or it’ll explode! Fold in the sides, then roll it up tightly from the bottom, creating a neat little package. This takes a bit of practice, honestly.
- Heat the Oil for Frying These Chimichangas:
- Now for the fun part! Pour about 2-3 inches of vegetable or canola oil into a heavy-bottomed pot or a deep skillet. You want it hot, around 350-375°F (175-190°C). If you don't have a thermometer, drop a tiny piece of tortilla in, it should sizzle immediately. This is where the kitchen starts to smell amazing, that delicious fried aroma filling the air. Be careful, hot oil is no joke!
- Fry Your Crispy Chicken Chimichangas to Golden Perfection:
- Carefully, using tongs, lower 1-2 chimichangas into the hot oil, seam-side down first. This helps seal them up and prevents them from unraveling. Fry them for about 2-3 minutes per side, or until they're beautifully golden brown and crispy all over. Don't overcrowd the pot, I usually do two at a time, max. Overcrowding drops the oil temperature, and you'll end up with greasy, sad chimichangas, which I've definitely done before!
- Drain and Keep Warm While You Finish Up:
- Once they're golden and crispy, carefully lift the chimichangas out of the oil with your tongs. Let any excess oil drip off, then transfer them to a plate lined with paper towels to drain. This step is super important for keeping them truly crispy! While you're frying the remaining chimichangas, you can keep the finished ones warm in a low oven (around 200°F/95°C) on a wire rack over a baking sheet. My kitchen always gets a little chaotic at this point, but it's all part of the process!
- Serve Your Crispy Chicken Chimichangas with Toppings:
- Alright, the grand finale! Once all your crispy Chicken Chimichangas are fried, it's time to serve them up. I love to drizzle them with warm red enchilada sauce, a dollop of cool sour cream, and a sprinkle of fresh cilantro. The contrast of the hot, crispy chimichanga with the cool, tangy toppings is just chef's kiss. They look vibrant and smell absolutely incredible. Get ready for some happy faces at the table!
Honestly, the best part about making these crispy Chicken Chimichangas is the moment everyone gathers around, eager for that first bite. There's usually a little bit of a mess, a stray piece of cheese here or there, but that’s just life in my kitchen. It’s a dish that brings smiles, and sometimes, a little happy sigh of contentment. It’s those small, messy moments that make cooking so special, don't you think?
Crispy Chicken Chimichangas Storage Tips
So, you've got leftover crispy Chicken Chimichangas? Lucky you! They actually store pretty well in an airtight container in the fridge for up to 3 days. Now, here's my honest advice: reheating is key. I microwaved them once, thinking it would be quick, and the tortilla turned into this sad, limp, soggy thing so don't do that, lol. For the best results, reheat them in an air fryer at 350°F (175°C) for about 5-7 minutes, or in a conventional oven at 375°F (190°C) for 10-15 minutes, until they’re heated through and, more importantly, crispy again! They won't be quite as fresh as straight out of the fryer, but they'll still be pretty darn good.

Ingredient Substitutions for Your Chimichangas
I've played around with these crispy Chicken Chimichangas quite a bit, and I've got some ideas for you! If chicken isn't your thing, seasoned ground beef or even shredded pork carnitas work wonderfully. I tried a black bean and corn filling once it worked, kinda, but wasn't quite the same comforting vibe. For cheese, a Mexican blend or even just cheddar can step in for Monterey Jack. If you want more heat, add a pinch of cayenne pepper or a dash of hot sauce to the chicken mixture. And if you're out of green chiles, a bit of finely diced bell pepper or even jalapeño (if you like spicy!) can offer a different but still tasty flavor. Experiment, see what you love!
Serving Your Crispy Chicken Chimichangas
These crispy Chicken Chimichangas are amazing on their own, but they really shine with some good company. I love serving them with a side of fluffy Mexican rice and creamy refried beans that's the classic combo, right? For drinks, a frosty margarita or even just a crisp lime soda hits the spot. Sometimes, for a truly relaxed evening, I'll pair them with a simple green salad dressed with a zesty vinaigrette, just to cut through the richness. And for dessert? Maybe some churros or a scoop of vanilla ice cream. This dish and a good rom-com on a Friday night? Yes please, that's my kind of perfection!
Crispy Chicken Chimichangas: A Little History
The chimichanga has a bit of a fun, disputed origin story, mainly centered around Arizona. Legend has it, a chef accidentally dropped a burrito into a deep fryer, and instead of saying a bad word, she exclaimed "chimichanga!" (a Spanish-equivalent of "thingamajig"). Whether that's entirely true or just a great tale, it's become a beloved Mexican-American staple. For me, it's less about the exact origin and more about the comfort and joy it brings. It's a dish that feels like a celebration of flavors and a testament to how accidental creations can become something truly special in our kitchens.
And there you have it, my take on these delightful crispy Chicken Chimichangas. They might have caused a few kitchen mishaps along the way, but every golden, crunchy bite is worth it. There’s something so satisfying about making something so comforting from scratch, even if it’s a little messy. I hope you give them a try and make some delicious, chaotic memories of your own. Let me know how your chimichangas turn out!

Frequently Asked Questions
- → How do I keep my chimichangas crispy after frying?
Honestly, the best way is to drain them well on paper towels immediately after frying. If you need to keep them warm, put them on a wire rack over a baking sheet in a low oven. This keeps air circulating and prevents sogginess, which I learned from experience!
- → Can I bake these Chicken Chimichangas instead of frying?
You totally can! I've tried it, and while they won't be quite as rich, they're still delicious. Lightly brush them with oil, then bake at 400°F (200°C) for 20-25 minutes, flipping halfway, until golden. They're a bit more "baked burrito" than "chimichanga," but still good!
- → What's the best way to shred chicken for the filling?
Oh, a stand mixer with the paddle attachment works wonders if you have one! Just put your cooked chicken in and let it run on low for a minute. Otherwise, two forks work perfectly well. I've done it both ways, and they both get the job done, just one is faster!
- → Can I make the chicken filling ahead of time?
Absolutely! I do this all the time. You can prepare the entire chicken filling mixture up to 2 days in advance and store it in an airtight container in the fridge. It makes assembly on cooking day so much quicker, which is a lifesaver for busy weeknights.
- → What other toppings can I use for my chimichangas?
Oh, the possibilities! I love fresh salsa, guacamole, pico de gallo, or even a drizzle of queso. Sometimes I'll add pickled jalapeños for an extra kick, or a squeeze of lime juice for brightness. It's all about what you're craving, so go wild!