

Oh, this Baked Caesar Chicken! It takes me right back to those early days when I was just figuring out my kitchen. I remember trying to recreate something I'd had at a little bistro, feeling totally overwhelmed but determined. My first attempt? A bit dry, honestly. The sauce was... okay. But the idea stuck with me, this comforting blend of savory chicken and that tangy, garlicky Caesar flavor. It's since become one of those dishes I turn to when I need something genuinely delicious that still feels like a hug. This recipe, with its ridiculously creamy Parmesan sauce, is my redemption story, a testament to not giving up on a good food dream.
Just last week, while making this Baked Caesar Chicken, I had one of those classic kitchen 'oops' moments. I was so excited about the sauce, I accidentally poured the heavy cream in before the chicken stock. Cue a few frantic stirs and a moment of panic that I'd ruined dinner. But you know what? It still came out wonderfully thick and rich. Sometimes, those little blunders lead to happy accidents, and that's the beauty of cooking at home, right?
Ingredients
- Boneless, Skinless Chicken Breasts: These are your canvas for this Baked Caesar Chicken. I usually go for about 1.5 lbs, sliced horizontally if they're super thick, just to ensure even cooking. Honestly, don't skimp on quality here, it makes a difference.
- Olive Oil: A good drizzle for searing. I always have a big bottle on hand, the kind that smells a bit peppery. It helps get that lovely golden crust before baking.
- Heavy Cream: This is non-negotiable for that luscious, rich sauce. Don't even think about using half-and-half or milk, you'll lose that luxurious texture, and honestly, you deserve the good stuff!
- Chicken Broth: Balances out the richness of the cream. I prefer low-sodium so I can control the salt myself. I once used vegetable broth, and it worked, kinda, but the chicken broth truly shines in this Baked Caesar Chicken.
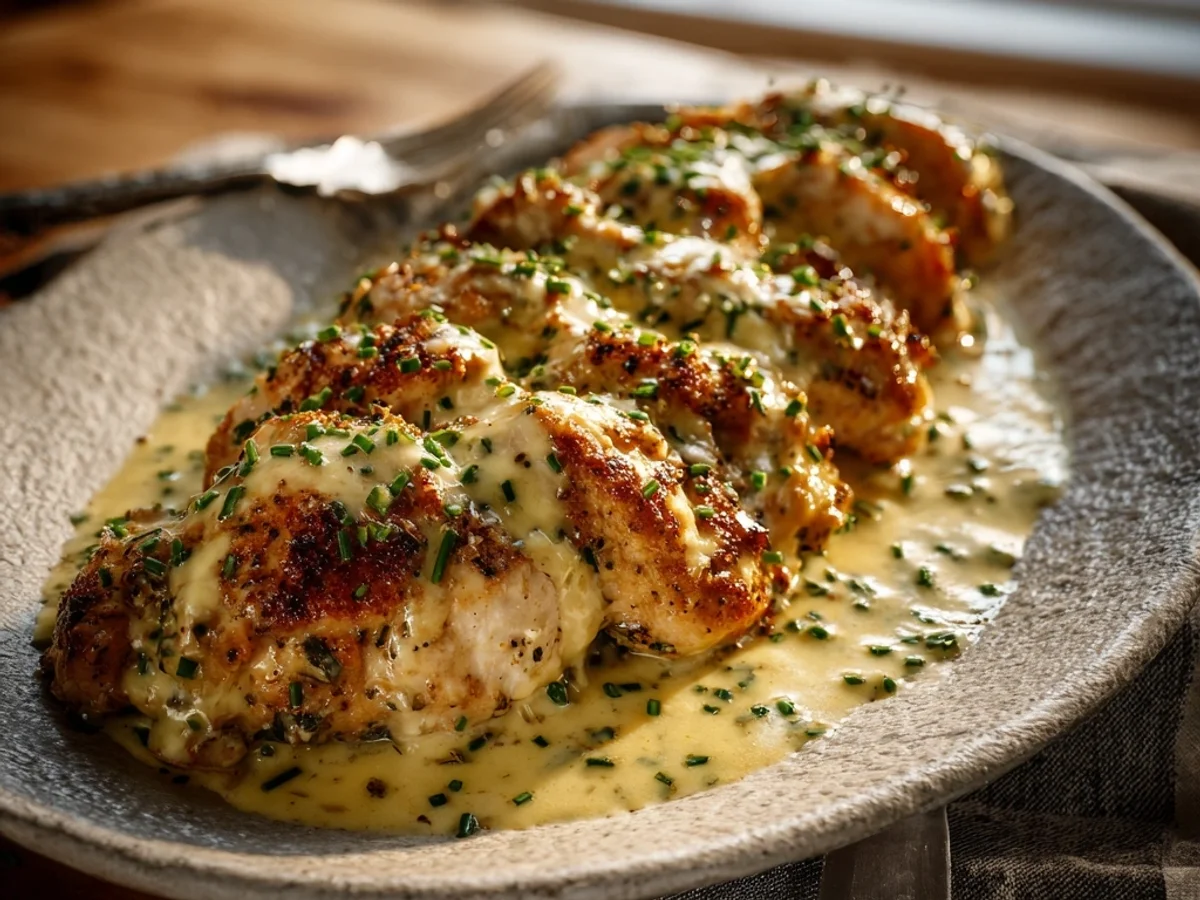
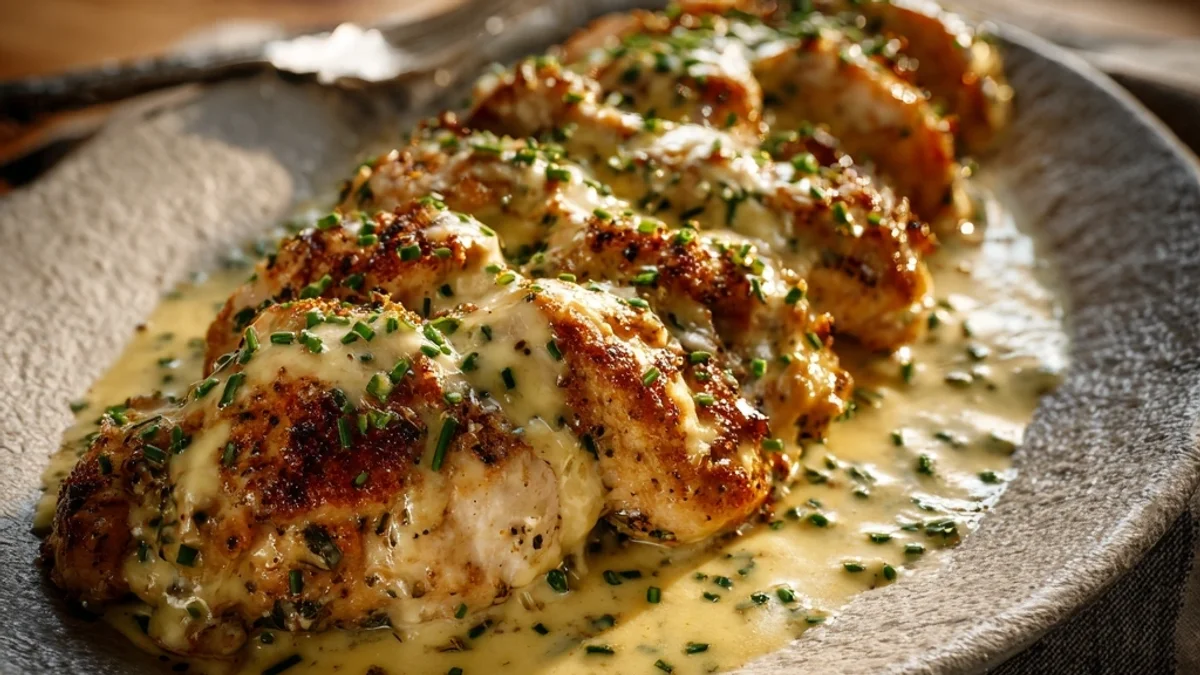
- Parmesan Cheese: Freshly grated, always. The pre-shredded stuff just doesn't melt the same, and you'll miss that nutty, sharp flavor. I go a little heavy on this, because, well, it's Parmesan!
- Caesar Dressing: Your secret weapon! Use a good quality, creamy Caesar dressing. I've tried a few brands, and honestly, the one from my local deli is fantastic, but any reputable brand works. It's what gives our Baked Caesar Chicken that iconic flavor.
- Garlic: minced. More is always more in my kitchen. I probably use double what most recipes call for. A little bit of garlic adds so much depth to the sauce for our Baked Caesar Chicken.
- Dried Italian Seasoning: A blend of herbs that just sings with chicken. I sometimes throw in a pinch of dried oregano too if I'm feeling extra.
- Salt & Black Pepper: To taste, of course! Seasoning throughout is key. I always taste as I go, especially with the sauce. A little pinch here, a grind there, makes all the difference.
- Fresh Parsley: Chopped, for a pop of color and a little fresh herbaceousness right at the end. It brightens everything up and makes this Baked Caesar Chicken look extra fancy.
Instructions
- Prep the Chicken:
- First things first, let's get that chicken ready for our Baked Caesar Chicken. Pat your boneless, skinless chicken breasts really dry with paper towels this is super important for getting a good sear! If they're extra thick, slice them horizontally to make thinner cutlets. Drizzle them with a little olive oil, then sprinkle generously with salt, pepper, and a pinch of Italian seasoning. Get those hands in there and rub it all over.
- Sear for Color:
- Now, grab a large, oven-safe skillet (cast iron is my fave for this!) and heat a tablespoon of olive oil over medium-high heat. Once shimmering, carefully place your seasoned chicken breasts in the hot pan. You're looking for a beautiful golden-brown crust, about 2-3 minutes per side. This isn't about cooking them through, just building flavor and color for our Baked Caesar Chicken. Don't crowd the pan, work in batches if you need to!
- Craft the Creamy Sauce:
- With the chicken briefly set aside, reduce the heat to medium. Add your minced garlic to the skillet and sauté for about 30 seconds until it's fragrant oh, that smell! Pour in the chicken broth, scraping up any delicious browned bits from the bottom of the pan, those are flavor bombs! Then, stir in the heavy cream and your favorite Caesar dressing. Let it simmer gently for 2-3 minutes, just until it starts to thicken slightly for your Baked Caesar Chicken.
- Add the Parmesan Magic:
- At this point, stir in the freshly grated Parmesan cheese. Keep stirring until it's completely melted and smooth. Taste the sauce this is where you adjust! Does it need more salt? A crack of fresh pepper? Maybe a little extra Caesar dressing if you're like me and love that tangy kick. This sauce is what makes this Baked Caesar Chicken shine, so make it sing!
- Nestle & Bake:
- Carefully place the seared chicken breasts back into the skillet, nestling them into that incredible creamy Parmesan sauce. Make sure they're mostly submerged. Now, transfer the entire skillet to your preheated oven at 375°F (190°C). Bake for 15-20 minutes, or until the chicken is cooked through and reaches an internal temperature of 165°F (74°C). Don't overcook it, or it'll get dry!
- Serve with a Flourish:
- Once your Baked Caesar Chicken is perfectly cooked and bubbling, carefully remove the skillet from the oven. Let it rest for a few minutes, this allows the juices to redistribute, keeping the chicken tender. Garnish generously with fresh chopped parsley. Serve immediately with your favorite sides. The aroma filling your kitchen right now? Pure happiness!
I remember one chaotic Tuesday evening, I was rushing to get this Baked Caesar Chicken on the table, kids buzzing around, and I accidentally dropped the entire container of Italian seasoning. Herbs everywhere! But even with that little mess, the smell of the garlic and simmering cream sauce quickly filled the kitchen, calming the storm. It's those real-life kitchen moments that make a dish truly special, you know?
Storing Baked Caesar Chicken
This Baked Caesar Chicken makes fantastic leftovers, honestly! I usually keep it in an airtight container in the fridge for about 3-4 days. When reheating, I've learned that microwaving it too aggressively can sometimes make the sauce separate a little so don't do that lol! The best way I've found is to gently warm it on the stovetop over low heat, adding a tiny splash of chicken broth or cream if the sauce seems too thick. Or, pop it back into the oven at 300°F (150°C) until heated through. The chicken stays tender, and the sauce holds up pretty well if you're careful.

Baked Caesar Chicken Ingredient Swaps
I've tried a few swaps over the years with this Baked Caesar Chicken. If you're out of boneless, skinless chicken breasts, chicken thighs work wonderfully, they might need a few extra minutes in the oven, but they stay incredibly juicy. For the Caesar dressing, if you don't have your favorite on hand, you can whip up a quick version with mayo, a squeeze of lemon, a touch of Dijon, and some garlic powder it worked, kinda, when I was in a pinch! If you want to add a veggie, tossing in some spinach or chopped broccoli during the last 10 minutes of baking is a great way to sneak in greens without much fuss. Just be prepared for a slightly less creamy sauce if the veggies release a lot of water.
Serving Baked Caesar Chicken
Serving this Baked Caesar Chicken is honestly half the fun! I love it with some simple roasted asparagus or a fresh green salad to cut through the richness. For a more substantial meal, creamy mashed potatoes or a pilaf rice are perfect for soaking up all that incredible Parmesan sauce. And for a truly comforting experience, a glass of crisp white wine (like a Sauvignon Blanc) and a cozy blanket on the couch with a good movie? Yes please! This dish is versatile enough for a weeknight but feels special enough for a casual dinner party. Don't forget some crusty bread for dipping, it's a must!
Cultural Backstory
While Caesar salad itself has a fascinating origin story (supposedly invented in Tijuana, Mexico, by an Italian-American restaurateur!), this Baked Caesar Chicken is my own little spin on that classic. It's a testament to how beloved flavors travel and evolve in home kitchens. I first discovered the magic of combining Caesar dressing with cooked chicken in a casual diner years ago, and I knew I had to bring that comfort home. It became special to me because it's a dish that uses familiar, comforting flavors in a way that feels both new and deeply satisfying. It's not steeped in centuries of tradition, but it's rich in the personal history of my own cooking journey, and that's what makes it truly mine.
Honestly, every time I pull this Baked Caesar Chicken out of the oven, bubbling and golden, it feels like a little victory. The house smells amazing, and I know everyone's going to be happy. It's more than just a meal, it's a moment of comfort and connection. I hope it brings as much joy and deliciousness to your kitchen as it does to mine. Don't forget to share your own kitchen adventures with this one!

Frequently Asked Questions
- → Can I use chicken thighs for this Baked Caesar Chicken recipe?
Oh, absolutely! I've done it many times. Chicken thighs will give you an even juicier result. Just know they might need a few extra minutes in the oven, so always check that internal temperature with a meat thermometer.
- → What if I don't have Caesar dressing on hand?
I've been there! You can whip up a quick substitute with mayo, lemon juice, Dijon mustard, garlic, and Parmesan. It won't be quite the same, but it gets the job done and still tastes pretty good!
- → My sauce separated a little, what did I do wrong?
Don't fret, it happens! Usually, it's from too high heat or simmering for too long after adding the cream. Next time, keep the heat gentle and stir constantly. It's a tricky balance sometimes, but you'll get it!
- → How long does this Baked Caesar Chicken last in the fridge?
I usually keep leftovers for about 3-4 days in an airtight container. Reheating gently on the stovetop or in the oven is best to keep the sauce creamy. Microwaving can sometimes make the sauce a bit sad.
- → Can I add vegetables to this dish?
Definitely! I often throw in some broccoli florets or sliced bell peppers during the last 10-15 minutes of baking. They soak up all that delicious sauce and make it a complete meal, which is a total win!